ol-flattop
Full Access Member
Hi all, I'm new here, but I've lurked pretty much since I got my KJ ('06) last November. Usually my questions have been answered in old threads, but I didn't find anything this time.
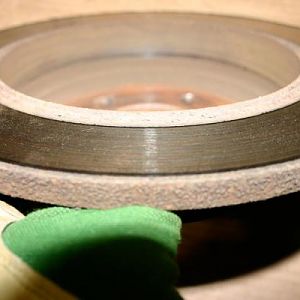
I adore this Jeep, but the previous owner didn't take the best care of it - the latest offender is the parking brake. As near as I can tell, I'm the first one to actually use it. I didn't think to check its function when I test drove it (which was a pretty big oversight), and so discovered while parking on a hill that it wouldn't hold the Jeep in place, and felt like it wasn't engaging at all. I figured it was out of adjustment (yeah, it's self-adjusting, I know now), and yanked it up again, this time with authority and vigor, determined that I was going to make it work (it didn't). A pop and small jolt followed, after which I noticed a squeaking/grinding/rubbing sound from the rear passenger side wheel with every rotation. On a hunch I tried pulling gently on the parking brake lever while in motion, and while the brake itself fared no better than before, it did make the cursed squeaking go away while partially engaged. Today, I finally had the time to remove both rear rotors and see just what was going on back there. The front shoe on each side had popped out of its track. At first I assumed I'd done this myself, but parts 3 and 4 on the diagram below were seized quite badly on both sides, so that I doubt I could have moved them enough to accomplish this.
Additionally, on the passenger side, an unnumbered part on this diagram (backing plate, or some such name? It's the big round sheet with the cutout for brake pads) was no longer attached as the one on the driver side was. There wasn't enough light for me to tell how they are supposed to be attached, but the one on the right is free to rub the rotor - which I suspect was the sound I heard. When I pulled on the lever, the mechanism clamped this plate against the frame behind it and stopped the noise.
All four shoes were...well, they had no material left to speak of. The drum portion of the right rotor looked ok at best. The left rotor's drum was caked in rust. The hardware was terrible.
However, the actual rotors and pads are in good shape. Would it be sufficient to attack the offending drum with some 80-grit sandpaper, replace the shoes and hardware, lube and work the sticking mechanism until it cooperates, and drive on?
Otherwise, I'm afraid I'm looking at $100 for four small, relatively unimportant pieces of metal (#'s 3-4 above), $50-$100 for new rotors, $20-$40 for pads, and more to replace that nameless sheet metal plate (which I suspect would require opening up a whole new can of worms I'd rather avoid), in addition to the totally reasonable $40 or so it will take to just sand off the bulk of the rust and and replace the shoes and hardware. Oh, and this is probably not the best time to add that I'm poor.:-({|=
So, what do you experienced Jeepers recommend? Thanks in advance!
I adore this Jeep, but the previous owner didn't take the best care of it - the latest offender is the parking brake. As near as I can tell, I'm the first one to actually use it. I didn't think to check its function when I test drove it (which was a pretty big oversight), and so discovered while parking on a hill that it wouldn't hold the Jeep in place, and felt like it wasn't engaging at all. I figured it was out of adjustment (yeah, it's self-adjusting, I know now), and yanked it up again, this time with authority and vigor, determined that I was going to make it work (it didn't). A pop and small jolt followed, after which I noticed a squeaking/grinding/rubbing sound from the rear passenger side wheel with every rotation. On a hunch I tried pulling gently on the parking brake lever while in motion, and while the brake itself fared no better than before, it did make the cursed squeaking go away while partially engaged. Today, I finally had the time to remove both rear rotors and see just what was going on back there. The front shoe on each side had popped out of its track. At first I assumed I'd done this myself, but parts 3 and 4 on the diagram below were seized quite badly on both sides, so that I doubt I could have moved them enough to accomplish this.
You must be registered for see images attach
Additionally, on the passenger side, an unnumbered part on this diagram (backing plate, or some such name? It's the big round sheet with the cutout for brake pads) was no longer attached as the one on the driver side was. There wasn't enough light for me to tell how they are supposed to be attached, but the one on the right is free to rub the rotor - which I suspect was the sound I heard. When I pulled on the lever, the mechanism clamped this plate against the frame behind it and stopped the noise.
All four shoes were...well, they had no material left to speak of. The drum portion of the right rotor looked ok at best. The left rotor's drum was caked in rust. The hardware was terrible.
However, the actual rotors and pads are in good shape. Would it be sufficient to attack the offending drum with some 80-grit sandpaper, replace the shoes and hardware, lube and work the sticking mechanism until it cooperates, and drive on?
Otherwise, I'm afraid I'm looking at $100 for four small, relatively unimportant pieces of metal (#'s 3-4 above), $50-$100 for new rotors, $20-$40 for pads, and more to replace that nameless sheet metal plate (which I suspect would require opening up a whole new can of worms I'd rather avoid), in addition to the totally reasonable $40 or so it will take to just sand off the bulk of the rust and and replace the shoes and hardware. Oh, and this is probably not the best time to add that I'm poor.:-({|=
So, what do you experienced Jeepers recommend? Thanks in advance!